Quectel RM520N Firmware Update: Difference between revisions
No edit summary |
No edit summary |
||
| (5 intermediate revisions by the same user not shown) | |||
| Line 1: | Line 1: | ||
This page describes how to update the firmware any of the Quectel RM520N modems within the Opale 5G Robot. | This page describes how to update the firmware of any of the Quectel RM520N modems within the Opale 5G Robot. | ||
'''<u>In the following, it | '''<u>In the following, it is assumed the Opale 5G Robot is properly configured and accessible through IP.</u>''' | ||
Note that the procedure described in this page will be obsoleted when Modem | Note that the procedure described in this page will be obsoleted when Modem updates will be integrated in the Opale Robot firmware. | ||
[[File:Robots_Slots.jpg|394x394px]] | [[File:Robots_Slots.jpg|394x394px]] | ||
| Line 9: | Line 9: | ||
The Opale 5G Robot can include one or two RM520N (Among other possible configurations) modem as illustrated in the above picture. | The Opale 5G Robot can include one or two RM520N (Among other possible configurations) modem as illustrated in the above picture. | ||
In order to '''SAFELY''' upgrade any modems from the Opale 5G Robot, this procedure needs to be carefully followed | In order to '''SAFELY''' upgrade any modems from the Opale 5G Robot, this procedure needs to be carefully followed. | ||
'''<u>This procedure describes updating one RM520N at a time and the RM520N must be inserted into SLOT 0.</u>''' | '''<u>This procedure describes updating one RM520N at a time and the RM520N must be inserted into SLOT 0.</u>''' | ||
| Line 15: | Line 15: | ||
You will have to open the robot in order to access the RM520N modems. | You will have to open the robot in order to access the RM520N modems. | ||
Power off the robot and | '''Power off the robot and remove the four screws on the sides in order to open the robot.''' | ||
Once the screws are removed | Once the screws are removed process with caution while removing the cover as antennas cables are connected to the RM520N modems. | ||
{| class="wikitable" | {| class="wikitable" | ||
|Once the robot is opened (and still powered off): | |Once the robot is opened (and still powered off): | ||
* If your robot has just one RM520N, it should be located at SLOT 0. In that case, there is nothing more to do inside the robot and you can carefully close the robot and screw the cover back on. | * If your robot has just one RM520N modem, it should be located at SLOT 0. In that case, there is nothing more to do inside the robot and you can carefully close the robot and screw the cover back on. | ||
* If you have two RM520Ns, as only the one in SLOT 0 will be safely upgraded, disconnect the modem in SLOT 1 by removing the screw which attach the modem to the SLOT, and, <u>without disconnecting the antennas from the modem</u>, remove the modem from the slot | * If you have two RM520Ns, as only the one in SLOT 0 will be safely upgraded, disconnect the modem in SLOT 1 by removing the screw which attach the modem to the SLOT, and, <u>without disconnecting the antennas from the modem</u>, remove the modem from the slot and leave it unplugged (while taking care that it does not touch any electric part) | ||
* | * To upgrade the modem which is in SLOT 1, you have to insert this modem into SLOT 0 and leave unplugged the modem which was in SLOT 0. | ||
'''<u>In any case, to properly execute the update procedure, only one RM520N should be inserted in the robot | '''<u>In any case, to properly execute the update procedure, only one RM520N should be inserted in the robot and in SLOT 0</u>''' | ||
|} | |} | ||
Once the robot is ready with the RM520N modem to be updated inserted in SLOT 0, it can be powered on. | Once the robot is ready with the RM520N modem to be updated inserted in SLOT 0, it can be powered on. | ||
| Line 55: | Line 55: | ||
root@ROBOT2p:/mnt/sdcard# echo "1" > /sys/class/gpio/mdm_pwr/value | root@ROBOT2p:/mnt/sdcard# echo "1" > /sys/class/gpio/mdm_pwr/value | ||
</syntaxhighlight>Then run the microcom terminal utility to enter AT commands to the RM520N modem:<syntaxhighlight lang="termcap"> | </syntaxhighlight>Then run the microcom terminal utility to enter AT commands to the RM520N modem (you may have to wait a few seconds so that the modem is ready):<syntaxhighlight lang="termcap"> | ||
root@ROBOT2p:/mnt/sdcard# microcom /dev/COM3 | root@ROBOT2p:/mnt/sdcard# microcom /dev/COM3 | ||
</syntaxhighlight>Then enter the following AT command to reconfigure the USB interface of the modem<syntaxhighlight lang="termcap"> | </syntaxhighlight>Then enter the following AT command to reconfigure the USB interface of the modem<syntaxhighlight lang="termcap"> | ||
| Line 85: | Line 85: | ||
[000.110]: md5 checking: ./update/multi_image_qti.mbn pass | [000.110]: md5 checking: ./update/multi_image_qti.mbn pass | ||
<...> | <...> | ||
[059.741]: Upgrade module successfully. | |||
[059.741]: inf[0] ep_in -1/1024, errno = 143 (Cannot send after socket shutdown) | |||
[059.741]: qusb_noblock_read read=-1, errno: 143 (Cannot send after socket shutdown) | |||
[059.742]: qusb_noblock_read cur=0, min_size=1 | |||
root@ROBOT2p:/mnt/sdcard# | root@ROBOT2p:/mnt/sdcard# | ||
</syntaxhighlight>The update is successfull if one of the last lines displayed shows that the module has been updated. | </syntaxhighlight>The update is successfull if one of the last lines displayed shows that the module has been successfully updated. | ||
It is now needed to reconfigure properly the modem for Robot usage. | It is now needed to reconfigure properly the modem for Robot usage. | ||
You need to run the microcom program as | You need to run the microcom program as shown below (with different device as the modem has now a default configuration):<syntaxhighlight lang="termcap"> | ||
at+qcfg | root@ROBOT2p:/mnt/sdcard# microcom /dev/ttyUSB2 | ||
</syntaxhighlight>Once connected, you'll have to enter the following AT commands:<syntaxhighlight lang="termcap"> | |||
at+qcfg="usbcfg",0x1075,0x407C,0,0,1,1,1,0,1 | |||
at+qcallcfg="voice_disable",2 | at+qcallcfg="voice_disable",2 | ||
AT+ | AT+qnvfw="/nv/item_files/modem/uim/remote/uim_remote_service_enable",01 | ||
at+cfun=1,1 | at+cfun=1,1 | ||
</syntaxhighlight> | </syntaxhighlight>Once this is done, the Robot software can be restarted with the following command:<syntaxhighlight lang="termcap"> | ||
root@ROBOT2p:/mnt/sdcard# sc restart all | |||
</syntaxhighlight>If there is another modem to update, then please proceed as explained at the beginning of this page. | |||
If there is no more update to be done, you can remove the directory /mnt/sdcard/update and the other files which are parts of the Quectel update delivery. | |||
Latest revision as of 22:45, 30 June 2025
This page describes how to update the firmware of any of the Quectel RM520N modems within the Opale 5G Robot.
In the following, it is assumed the Opale 5G Robot is properly configured and accessible through IP.
Note that the procedure described in this page will be obsoleted when Modem updates will be integrated in the Opale Robot firmware.
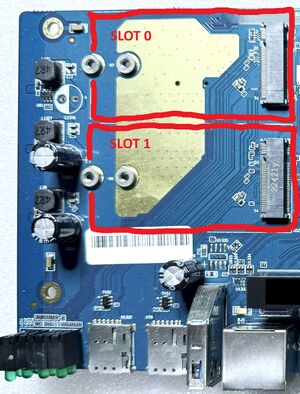
The Opale 5G Robot can include one or two RM520N (Among other possible configurations) modem as illustrated in the above picture.
In order to SAFELY upgrade any modems from the Opale 5G Robot, this procedure needs to be carefully followed.
This procedure describes updating one RM520N at a time and the RM520N must be inserted into SLOT 0.
You will have to open the robot in order to access the RM520N modems.
Power off the robot and remove the four screws on the sides in order to open the robot.
Once the screws are removed process with caution while removing the cover as antennas cables are connected to the RM520N modems.
Once the robot is opened (and still powered off):
In any case, to properly execute the update procedure, only one RM520N should be inserted in the robot and in SLOT 0 |
Once the robot is ready with the RM520N modem to be updated inserted in SLOT 0, it can be powered on.
First, the new RM520N modem firmware has to be downloaded on the Robot using a SFTP client.

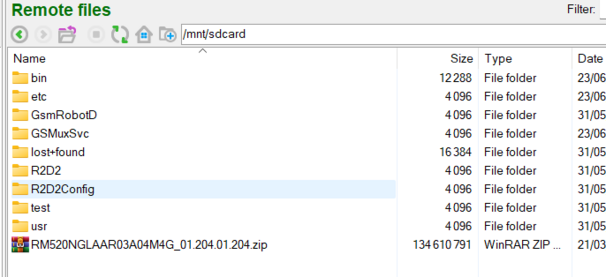
The picture above shows where the Quectel RM520N Update file has to be downloaded. Once this is done, the RM520N Update file need to be unzipped with the following command:
  _______                     ________        __
 |       |.-----.-----.-----.|  |  |  |.----.|  |_
 |   -   ||  _  |  -__|     ||  |  |  ||   _||   _|
 |_______||   __|_____|__|__||________||__|  |____|
          |__| W I R E L E S S   F R E E D O M
 -----------------------------------------------------
 OpenWrt 22.03-SNAPSHOT, r0-031ace73
 -----------------------------------------------------
root@ROBOT2p:~# cd /mnt/sdcard
root@ROBOT2p:/mnt/sdcard# unzip RM520N*
Archive:  RM520NGLAAR03A04M4G_01.204.01.204.zip
  inflating: md5.txt
  <...>
  inflating: update/firehose/partition_complete_p4K_b256K.mbn
  inflating: Quectel_RM520N-GL-AA_Firmware_Release_Notes_V0304_01.204.01.204.pdf
root@ROBOT2p:/mnt/sdcard#
The system should then be prepared with the following commands:
- The first one stops the robot software,
- and the second one power up the modem, so that we can set it up later.
root@ROBOT2p:/mnt/sdcard# sc stop all
root@ROBOT2p:/mnt/sdcard# echo "1" > /sys/class/gpio/mdm_pwr/value
Then run the microcom terminal utility to enter AT commands to the RM520N modem (you may have to wait a few seconds so that the modem is ready):
root@ROBOT2p:/mnt/sdcard# microcom /dev/COM3
Then enter the following AT command to reconfigure the USB interface of the modem
at+qcfg="usbcfg",0x2c7c,0x0801,1,1,1,1,1,0,0
at+cfun=1,1
You may have to enter <control-x> in order to exit the microcom terminal utility. Then the module can be updated with the following commands:
root@ROBOT2p: cd /mnt/sdcard
root@ROBOT2p:/mnt/sdcard# QFirehose -f .
[000.000]: Version: QFirehose_Linux_Android_V1.4.21
[000.000]: Builded: Apr  5 2025 18:08:59
[000.000]: Find md5 check file <./md5.txt>
[000.005]: md5 checking: ./contents.xml pass
[000.025]: md5 checking: ./update/abl.elf pass
[000.041]: md5 checking: ./update/aop.mbn pass
[000.045]: md5 checking: ./update/apdp.mbn pass
[000.050]: md5 checking: ./update/devcfg_low_ddr.mbn pass
[000.054]: md5 checking: ./update/devcfg.mbn pass
[000.056]: md5 checking: ./update/firehose/partition_complete_p4K_b256K.mbn pass
[000.056]: md5 checking: ./update/firehose/patch_p4K_b256K.xml pass
[000.085]: md5 checking: ./update/firehose/prog_firehose_lite.elf pass
[000.086]: md5 checking: ./update/firehose/rawprogram_nand_p4K_b256K_update.xml pass
[000.097]: md5 checking: ./update/hyp.mbn pass
[000.103]: md5 checking: ./update/ipa_fws.elf pass
[000.106]: md5 checking: ./update/logfs_ufs_8mb.bin pass
[000.108]: md5 checking: ./update/multi_image.mbn pass
[000.110]: md5 checking: ./update/multi_image_qti.mbn pass
<...>
[059.741]: Upgrade module successfully.
[059.741]: inf[0] ep_in -1/1024, errno = 143 (Cannot send after socket shutdown)
[059.741]: qusb_noblock_read read=-1, errno: 143 (Cannot send after socket shutdown)
[059.742]: qusb_noblock_read cur=0, min_size=1
root@ROBOT2p:/mnt/sdcard#
The update is successfull if one of the last lines displayed shows that the module has been successfully updated.
It is now needed to reconfigure properly the modem for Robot usage.
You need to run the microcom program as shown below (with different device as the modem has now a default configuration):
root@ROBOT2p:/mnt/sdcard# microcom /dev/ttyUSB2
Once connected, you'll have to enter the following AT commands:
at+qcfg="usbcfg",0x1075,0x407C,0,0,1,1,1,0,1
at+qcallcfg="voice_disable",2
AT+qnvfw="/nv/item_files/modem/uim/remote/uim_remote_service_enable",01
at+cfun=1,1
Once this is done, the Robot software can be restarted with the following command:
root@ROBOT2p:/mnt/sdcard# sc restart all
If there is another modem to update, then please proceed as explained at the beginning of this page.
If there is no more update to be done, you can remove the directory /mnt/sdcard/update and the other files which are parts of the Quectel update delivery.
